
However, that being said, I have some problems with it. First, it can be really time consuming and complicated. If you type in "contouring" on Pinterest, you get a bunch of really good, but really in-depth tutorials. These often have you putting on primer, foundation, concealer, highlighter, and bronzer, and a plethora of other things. While this is no doubt the best way to achieve the look, it's not exactly what you want to do when you have class or dinner reservations in an hour. Ain't nobody got time fo dat. My other bone to pick is that these contouring tutorials have you using things like $30 highlighter. While I would totally love to buy awesome highlighters, I'm in college and have no money to spare. So, it got me thinking and experimenting, and this is what I came up with. I call it, "Drugstore Makeup Contouring". I apologize if this is a longer post; I talk a lot! This is what I used, you can get it all at any Walgreens, Target, etc. (don't judge my dirty counter):

Left to right: stippling brush, Physician's Formula bronzer ($13), Maybelline Dream Mousse in Pink Frosting ($8), Revlon Photo Ready foundation ($10), Mary Kay Timewise foundation ($20, ok sorry I lied a little, you have to order this and it's a little pricey but it is AMAZING), NYX HD Photogenic Concealer ($5; I recommend the green shade), a sponge, and a foundation brush.
This was all stuff I had laying around; most of these are basic cosmetic items, so you can substitute them for whatever you have! I had a darker foundation from the summer and my really light one for the winter, so this is also a great way to use up your old dark foundations that are just collecting dust. If you don't have any, feel free to switch it out with a simple dark concealer! Here's what I did:
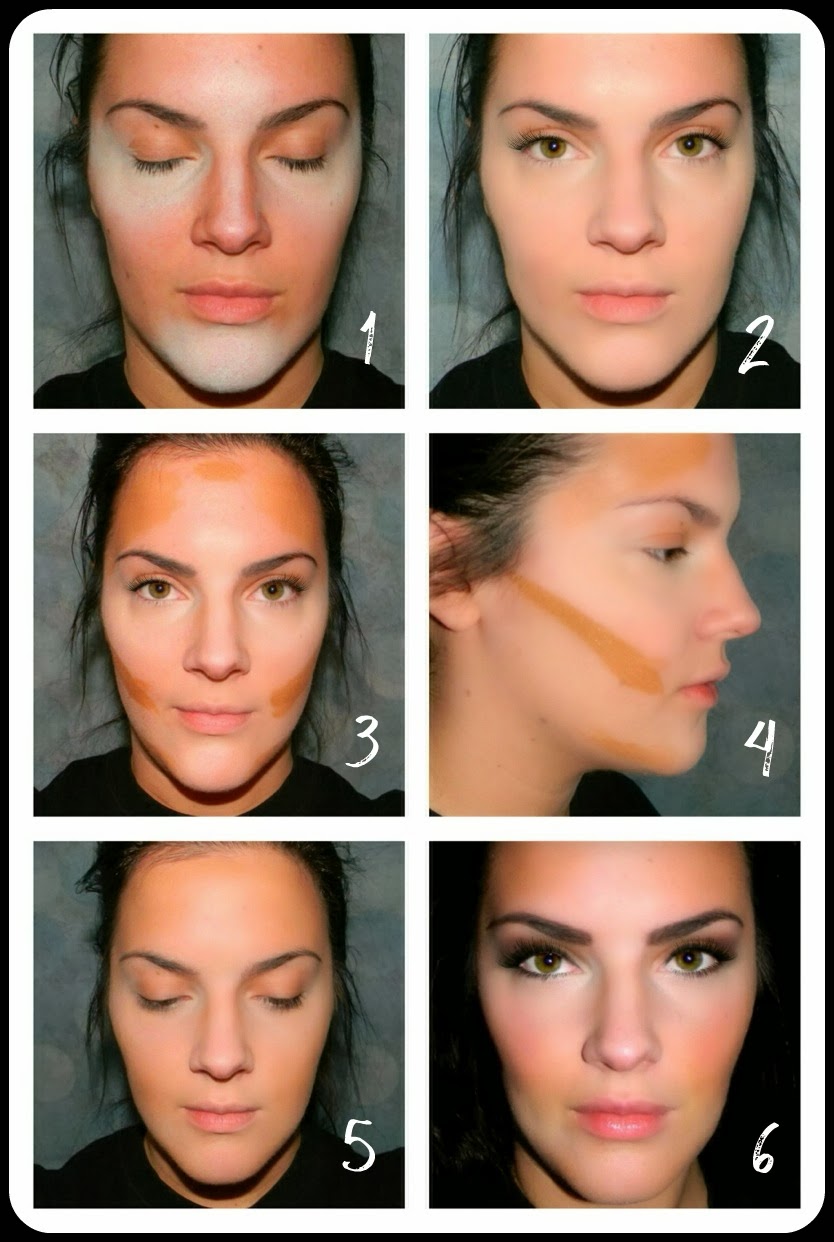
1.) Take the NYX concealer and place it in 4 areas: under your eyes/the top of your cheekbones, your chin, the center of your forehead, and a little on the bridge of your nose. Blend it as shown. Because the NYX is green to neutralize the reds of your skin, I like to apply it before my foundation. If you're just using a lighter concealer, simply switch the order of steps 1 and 2!
2.) Apply your light shade of foundation with your sponge or foundation brush. To get a really good look, have your foundation be a shade lighter than your skin and your darker concealer or foundation be really dark. If you blend it well, this difference in shades takes out the need for lots of (or any) highlighter.
3.) Take your darker foundation or concealer and place a little on the back of your hand. With a concealer brush or your foundation brush, draw a line from the top of your cheekbone near your ear down to about an inch from your mouth. Think of The Joker! Follow the natural shape of your face. If your cheekbones are higher or lower, draw your line a little higher or lower so it flatters your face best. Place more foundation at your temples, the center of your forehead, and a small amount on either side of your chin. For simplicity's sake, don't worry about contouring your nose. If you really want to, draw a small line on either side of your bridge.
4.) How it looks from the side. If you want a more subtle or dramatic look, make the lines thinner or thicker.
5.) Taking your foundation brush, use circular motions to blend out your contour markings. You should end with subtle definition, and the illusion of a glowing skin.
6.) Add some blush and dust over with some bronzer to define everything even more. You're done!! You can finish the look any way you want. I filled in my brows and did a basic smokey eye to show the effect this has on a basic makeup look, and took a picture with bright flash to show how it photographs. I looooove it.
While this seems like lots of info, I promise after a little practice, it ends up being super quick. And MUCH quicker and more subtle than a full-on contoured look. I wanted to make a practical tutorial for everyday use, with things everyone has. It may not be as simple as slapping some makeup on your face, but it's only taken my foundation routine from about 2 minutes to maybe 7 or 8 tops. I hope you all enjoy!!!
No comments:
Post a Comment